CSS is the language we use to style a Web page.
What is CSS?
- CSS stands for Cascading Style Sheets
- CSS describes how HTML elements are to be displayed on screen, paper, or in other media
- CSS saves a lot of work. It can control the layout of multiple web pages all at once
- External stylesheets are stored in CSS files
Why Use CSS?
CSS is used to define styles for your web pages, including the design, layout and variations in display for different devices and screen sizes.
CSS Example
body {
    background-color: lightblue;
  }

h1 {
  color: white;
  text-align: center;
  }

p {
  font-family: verdana;
  font-size: 20px;
  }
CSS Solved a Big Problem
HTML was NEVER intended to contain tags for formatting a web page!
HTML was created to describe the content of a web page, like:
            <h1>This is a heading</h1>


<p>This is a paragraph.</p>
When tags like <font>, and color attributes were
added to the HTML 3.2 specification, it started a nightmare for web
developers. Development of large websites, where fonts and color
information were added to every single page, became a long and
expensive process. To solve this problem, the World Wide Web
Consortium (W3C) created CSS. CSS removed the style formatting from
the HTML page!
CSS Saves a Lot of Work!
The style definitions are normally saved in external .css files. With an external stylesheet file, you can change the look of an entire website by changing just one file!
A CSS rule consists of a selector and a declaration block..
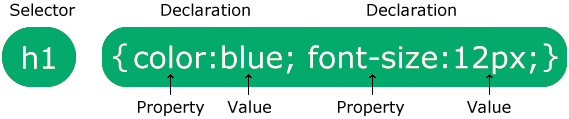
The selector points to the HTML element you want to style.
The declaration block contains one or more declarations separated by semicolons.
Each declaration includes a CSS property name and a value, separated by a colon.
Multiple CSS declarations are separated with semicolons, and declaration blocks are surrounded by curly braces.
Example
In this example all <p> elements will be center-aligned, with a red text color:
p {
  color: red;
  text-align: center;
  }
Example Explained
pis a selector in CSS (it points to the HTML element you want to style: <p>).coloris a property, andredis the property valuetext-alignis a property, andcenteris the property value
A CSS selector selects the HTML element(s) you want to style.
CSS Selectors
CSS selectors are used to "find" (or select) the HTML elements you want to style.
We can divide CSS selectors into five categories:
- Simple selectors (select elements based on name, id, class)
- Combinator selectors (select elements based on a specific relationship between them)
- Pseudo-class selectors (select elements based on a certain state)
- Pseudo-elements selectors (select and style a part of an element)
- Attribute selectors (select elements based on an attribute or attribute value)
This section will explain the most basic CSS selectors.
The CSS element Selector
The element selector selects HTML elements based on the element name.
Example
Here, all <p> elements on the page will be center-aligned, with a red text color:
p {
  color: red;
  text-align: center;
  }
The CSS id Selector
The id selector uses the id attribute of an HTML element to select a specific element.
The id of an element is unique within a page, so the id selector is used to select one unique element!
To select an element with a specific id, write a hash (#) character, followed by the id of the element.
Example
The CSS rule below will be applied to the HTML element with id="para1":
#para1 {
  text-align: center;
  color: red;
  }
Note: An id name cannot start with a number!
The CSS class Selector
The class selector selects HTML elements with a specific class attribute.
To select elements with a specific class, write a period (.) character, followed by the class name.
Example
In this example all HTML elements with class="center" will be red and center-aligned:
.center {
  text-align: center;
  color: red;
  }
You can also specify that only specific HTML elements should be affected by a class.
Example
In this example only <p> elements with class="center" will be red and center-aligned:
p.center {
  text-align: center;
  color: red;
  }
HTML elements can also refer to more than one class.
Example
In this example the <p> element will be styled according to class="center" and to class="large":
<p class="center large">This paragraph refers to two classes.</p>
Note: A class name cannot start with a number!
The CSS Universal Selector
The universal selector (*) selects all HTML elements on the page.
Example
The CSS rule below will affect every HTML element on the page:
* {
  text-align: center;
  color: blue;
  }
The CSS Grouping Selector
The grouping selector selects all the HTML elements with the same style definitions.
Look at the following CSS code (the h1, h2, and p elements have the same style definitions):
h1 {
  text-align: center;
  color: red;
  }

h2 {
  text-align: center;
  color: red;
  }

p {
  text-align: center;
  color: red;
  }
It will be better to group the selectors, to minimize the code.
To group selectors, separate each selector with a comma.
Example
In this example we have grouped the selectors from the code above:
h1, h2, p {
  text-align: center;
  color: red;
  }
When a browser reads a style sheet, it will format the HTML document according to the information in the style sheet.
Three Ways to Insert CSS
There are three ways of inserting a style sheet:
- External CSS
- Internal CSS
- Inline CSS
External CSS
With an external style sheet, you can change the look of an entire website by changing just one file!
Each HTML page must include a reference to the external style sheet file inside the <link> element, inside the head section.
Example
External styles are defined within the <link> element, inside the <head> section of an HTML page:
<!DOCTYPE html>
<html>
<head>
<link rel="stylesheet" href="mystyle.css">
</head>
<body>

<h1>This is a heading</h1>
<p>This is a paragraph.</p>

</body>
</html>
An external style sheet can be written in any text editor, and must be saved with a .css extension.
The external .css file should not contain any HTML tags.
Here is how the "mystyle.css" file looks:
"mystyle.css"
In this example we have grouped the selectors from the code above:
body {
  background-color: lightblue;
  }

h1 {
  color: navy;
  margin-left: 20px;
  }
Note: Do not add a space between the property value and the unit (such as margin-left: 20 px;). The correct way is: margin-left: 20px;
Internal CSS
An internal style sheet may be used if one single HTML page has a unique style.
The internal style is defined inside the <style> element, inside the head section.
Example
External styles are defined within the <link> element, inside the <head> section of an HTML page:
<!DOCTYPE html>
<html>
<head>
<style>
body {
    background-color: linen;
  }

  h1 {
      color: maroon;
        margin-left: 40px;

        </style>
        </head>
        <body>

        <h1>This is a heading</h1>
        <p>This is a paragraph.</p>

        </body>
        </html>
Internal styles are defined within the <style> element, inside the <head> section of an HTML page:
Inline CSS
An inline style may be used to apply a unique style for a single element.
To use inline styles, add the style attribute to the relevant element. The style attribute can contain any CSS property.
Example
Inline styles are defined within the "style" attribute of the relevant element:
<!DOCTYPE html>
<html>
<body>

<h1 style="color:blue;text-align:center;">This is a heading</h1>
<p style="color:red;">This is a paragraph.</p>

</body>
</html>
Tip: An inline style loses many of the advantages of a style sheet (by mixing content with presentation). Use this method sparingly.
Multiple Style Sheets
If some properties have been defined for the same selector (element) in different style sheets, the value from the last read style sheet will be used.
Assume that an external style sheet has the following style for the <h1> element:
h1 {
  color: navy;
  }
Tip: An inline style loses many of the advantages of a style sheet (by mixing content with presentation). Use this method sparingly.
Then, assume that an internal style sheet also has the following style for the <h1> element:
h1 {
  color: orange;
  }
Tip: An inline style loses many of the advantages of a style sheet (by mixing content with presentation). Use this method sparingly.
Example
If the internal style is defined after the link to the external style sheet, the <h1> elements will be "orange":
<head>
<link rel="stylesheet" type="text/css" href="mystyle.css">
<style>
h1 {
    color: orange;
  }
  </style>
  </head>
Example
However, if the internal style is defined before the link to the external style sheet, the <h1> elements will be "navy":
<head>
<style>
h1 {
    color: orange;
}
</style>
<link rel="stylesheet" type="text/css" href="mystyle.css">
</head>
Cascading Order
What style will be used when there is more than one style specified for an HTML element?
All the styles in a page will "cascade" into a new "virtual" style sheet by the following rules, where number one has the highest priority:
- Inline style (inside an HTML element)
- Inline style (inside an HTML element)
- Browser default
So, an inline style has the highest priority, and will override external and internal styles and browser defaults.
CSS comments are not displayed in the browser, but they can help document your source code.
CSS Comments
Comments are used to explain the code, and may help when you edit the source code at a later date.
Comments are ignored by browsers.
A CSS comment is placed inside the <style> element, and starts with /* and ends with */:
Example
/* This is a single-line comment */
p {
  color: red;
  }
You can add comments wherever you want in the code:
Example
p {
  color: red;  /* Set text color to red */
  }
Comments can also span multiple lines:
Example
/* This is
a multi-line
comment */

p {
  color: red;
  }
Colors are specified using predefined color names, or RGB, HEX, HSL, RGBA, HSLA values.
CSS Color Names
In CSS, a color can be specified by using a predefined color name:
Tomato
Orange
DodgerBlue
MediumSeaGreen
Gray
SlateBlue
Violet
LightGray
CSS/HTML support 140 standard color names.
CSS Background Color
You can set the background color for HTML elements:
Hello World
Lorem ipsum dolor sit amet, consectetuer adipiscing elit, sed diam nonummy nibh euismod tincidunt ut laoreet dolore magna aliquam erat volutpat. Ut wisi enim ad minim veniam, quis nostrud exerci tation ullamcorper suscipit lobortis nisl ut aliquip ex ea commodo consequat.
Example
<h1 style="background-color:DodgerBlue;">Hello World</h1>
<p style="background-color:Tomato;">Lorem ipsum...</p>
CSS Text Color
You can set the color of text:
Hello World
Lorem ipsum dolor sit amet, consectetuer adipiscing elit, sed diam nonummy nibh euismod tincidunt ut laoreet dolore magna aliquam erat volutpat.
Ut wisi enim ad minim veniam, quis nostrud exerci tation ullamcorper suscipit lobortis nisl ut aliquip ex ea commodo consequat.
Example
<h1 style="color:Tomato;">Hello World</h1>
<p style="color:DodgerBlue;">Lorem ipsum...</p>
<p style="color:MediumSeaGreen;">Ut wisi enim...</p>
CSS Border Color
You can set the color of borders:
Hello World
Hello World
Hello World
Example
<h1 style="border:2px solid Tomato;">Hello World</h1>
<h1 style="border:2px solid DodgerBlue;">Hello World</h1>
<h1 style="border:2px solid Violet;">Hello World</h1>
CSS Color Values
In CSS, colors can also be specified using RGB values, HEX values, HSL values, RGBA values, and HSLA values:
Same as color name "Tomato":
rgb(255, 99, 71)
#ff6347
hsl(9, 100%, 64%)
Same as color name "Tomato", but 50% transparent:
rgba(255, 99, 71, 0.5)
hsla(9, 100%, 64%, 0.5)
In addition to the predefined color names, colors can be specified using RGB, HEX, HSL, or even transparent colors using RGBA or HSLA color values.
Example
<h1 style="background-color:rgb(255, 99, 71);">...</h1>
<h1 style="background-color:#ff6347;">...</h1>
<h1 style="background-color:hsl(9, 100%, 64%);">...</h1>

<h1 style="background-color:rgba(255, 99, 71, 0.5);">...</h1>
<h1 style="background-color:hsla(9, 100%, 64%, 0.5);">...</h1>
The CSS background properties are used to add background effects for elements.
CSS background-color
The background-color property specifies the background color of an element.
Example
The background color of a page is set like this:
body {
  background-color: lightblue;
  }
With CSS, a color is most often specified by:
- a valid color name - like "red"
- a HEX value - like "#ff0000"
- an RGB value - like "rgb(255,0,0)"
CSS background-image
The background-image property specifies an image to use as the background of an element.
By default, the image is repeated so it covers the entire element.
Example
Set the background image for a page:
body {
  background-image: url("paper.gif");
  }
The background image can also be set for specific elements, like the
element:
Example
Set the background image for a page:
p {
  background-image: url("paper.gif");
  }
The CSS border properties allow you to specify the style, width, and color of an element's border.
CSS Border Style
The border-style property specifies what kind of border to display.
The following values are allowed:
dotted- Defines a dotted borderdashed- Defines a dashed bordersolid- Defines a solid borderdouble- Defines a double bordergroove- Defines a 3D grooved border. The effect depends on the border-color valueridge- Defines a 3D ridged border. The effect depends on the border-color valueinset- Defines a 3D inset border. The effect depends on the border-color valueoutset- Defines a 3D outset border. The effect depends on the border-color valuenone- Defines no borderhidden- Defines a hidden border
The border-style property can have from one to four values
(for the top border, right border, bottom border, and the left border).
Example
Demonstration of the different border styles:
p.dotted {border-style: dotted;}
p.dashed {border-style: dashed;}
p.solid {border-style: solid;}
p.double {border-style: double;}
p.groove {border-style: groove;}
p.ridge {border-style: ridge;}
p.inset {border-style: inset;}
p.outset {border-style: outset;}
p.none {border-style: none;}
p.hidden {border-style: hidden;}
p.mix {border-style: dotted dashed solid double;}
Result:
A dotted border.
A dashed border.
A solid border.
A double border.
A groove border.
A ridge border.
An inset border.
An outset border.
No border.
A mixed border.
CSS Border Width
The border-width property specifies the width of the four borders.
The width can be set as a specific size (in px, pt, cm, em, etc) or by using one of the three pre-defined values: thin, medium, or thick:
Example
Demonstration of the different border widths:
p.one {
  border-style: solid;
  border-width: 5px;
  }

p.two {
  border-style: solid;
  border-width: medium;
  }

p.three {
  border-style: dotted;
  border-width: 2px;
  }

p.four {
  border-style: dotted;
  border-width: thick;
  }
Result:
Some text.
Some text.
Some text.
Some text.
Some text.
Some text.
Specific Side Widths
The border-width property can have from one to four values (for the top border, right border, bottom border, and the left border):
Example
p.one {
  border-style: solid;
  border-width: 5px 20px; /* 5px top and bottom, 20px on the sides */
  }

p.two {
  border-style: solid;
  border-width: 20px 5px; /* 20px top and bottom, 5px on the sides */
  }

p.three {
  border-style: solid;
  border-width: 25px 10px 4px 35px; /* 25px top, 10px right, 4px bottom and 35px left */
  }
CSS Border Color
The border-color property is used to set the color of the four borders.
The color can be set by:
- name - specify a color name, like "red"
- HEX - specify a HEX value, like "#ff0000"
- RGB - specify a RGB value, like "rgb(255,0,0)"
- HSL - specify a HSL value, like "hsl(0, 100%, 50%)"
- transparent
Note: If border-color is not set, it inherits the color of the element.
Example
Demonstration of the different border colors:
p.one {
  border-style: solid;
  border-color: red;
  }

p.two {
  border-style: solid;
  border-color: green;
  }

p.three {
  border-style: dotted;
  border-color: blue;
 }
Result:
A solid red border
A solid green border
A dotted blue border
Specific Side Colors
The border-color property can have from one to four values (for the top border, right border, bottom border, and the left border).
Example
p.one {
  border-style: solid;
  border-color: red green blue yellow; /* red top, green right, blue bottom and yellow left */
  }
A solid multicolor border
Margins are used to create space around elements, outside of any defined borders.
CSS Margins
The CSS margin properties are used to create space around elements, outside of any defined borders.

With CSS, you have full control over the margins. There are properties for setting the margin for each side of an element (top, right, bottom, and left).
CSS has properties for specifying the margin for each side of an element:
- margin-top
- margin-right
- margin-bottom
- margin-left
All the margin properties can have the following values:
- auto - the browser calculates the margin
- length - specifies a margin in px, pt, cm, etc.
- % - specifies a margin in % of the width of the containing element
- inherit - specifies that the margin should be inherited from the parent element
Tip: Negative values are allowed.
Example
Set different margins for all four sides of a <p> element:
p {
  margin-top: 100px;
  margin-bottom: 100px;
  margin-right: 150px;
  margin-left: 80px;
  }
Padding is used to create space around an element's content, inside of any defined borders.
CSS Padding
CSS Padding
The CSS padding properties are used to generate space around an element's content, inside of any defined borders.
With CSS, you have full control over the padding.
There are properties for setting the padding for each side of an element (top, right, bottom, and left).
Padding - Individual Sides
CSS has properties for specifying the padding for each side of an element:
- padding-top
- padding-right
- padding-bottom
- padding-left
All the padding properties can have the following values:
- length - specifies a padding in px, pt, cm, etc.
- % - specifies a padding in % of the width of the containing element
- inherit - specifies that the padding should be inherited from the parent element
Note: Negative values are not allowed.
Example
Set different padding for all four sides of a <div> element:
div {
  padding-top: 50px;
  padding-right: 30px;
  padding-bottom: 50px;
    padding-left: 80px;
  }
The CSS height and width properties are used to set the height and width of an element.
CSS Setting height and width
The height and width properties are used to set the height and width of an element.
The height and width properties do not include padding, borders, or margins. It sets the height/width of the area inside the padding, border, and margin of the element.
CSS height and width Values
The height and width properties may have the following values:
auto- This is default. The browser calculates the height and widthlength- Defines the height/width in px, cm etc.%- Defines the height/width in percent of the containing blockinitial- Sets the height/width to its default valueinherit- The height/width will be inherited from its parent value
CSS height and width Examples
Example
Set the height and width of a <div> element:
div {
  height: 200px;
  width: 50%;
  background-color: powderblue;
  }
Example
Set the height and width of another <div> element:
div {
  height: 100px;
  width: 250px;
  background-color: powderblue;
  }
Note: Remember that the height and width properties do not include padding, borders, or margins! They set the height/width of the area inside the padding, border, and margin of the element!
All HTML elements can be considered as boxes.
The CSS Box Model
In CSS, the term "box model" is used when talking about design and layout.
The CSS box model is essentially a box that wraps around every HTML element.
It consists of: margins, borders, padding, and the actual content.
The image below illustrates the box model:
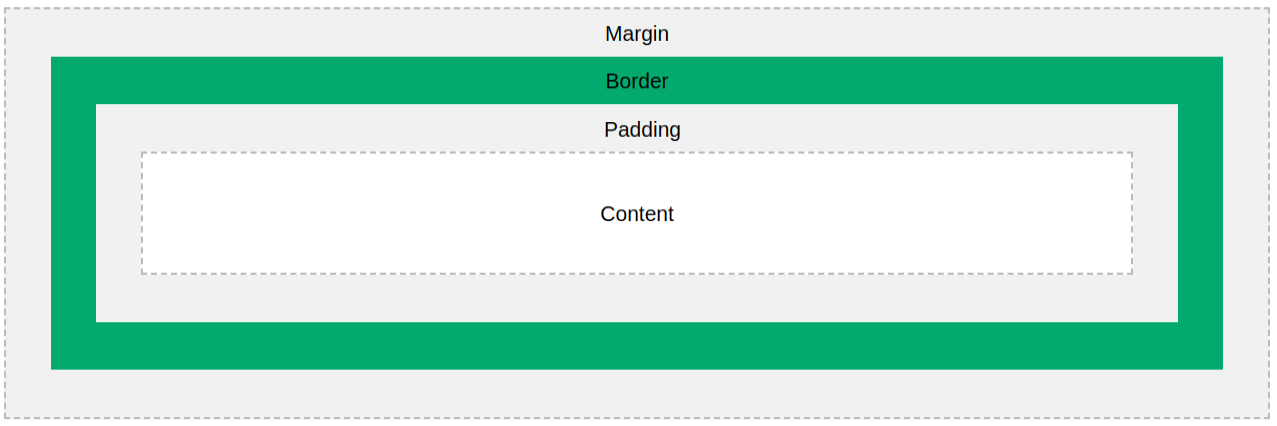
Explanation of the different parts:
- Content - The content of the box, where text and images appear
- Padding - Clears an area around the content. The padding is transparent
- Border - A border that goes around the padding and content
- Margin - Clears an area outside the border. The margin is transparent
The box model allows us to add a border around elements, and to define space between elements.
Example
Demonstration of the box model:
div {
  width: 300px;
  border: 15px solid green;
  padding: 50px;
  margin: 20px;
  }
Width and Height of an Element
In order to set the width and height of an element correctly in all browsers, you need to know how the box model works.
Important: When you set the width and height properties of an element with CSS, you just set the width and height of the content area. To calculate the full size of an element, you must also add padding, borders and margins.
Example
This <div> element will have a total width of 350px:
div {
  width: 320px;
  padding: 10px;
  border: 5px solid gray;
  margin: 0;
  }
Calculate the total width:

Here is the calculation:
220px (width)
+ 20px (left + right padding)
+ 10px (left + right border)
+ 0px (left + right margin)
= 250px
The total width of an element should be calculated like this:
Total element width = width + left padding + right padding + left border + right border + left margin + right margin
The total height of an element should be calculated like this:
Total element height = height + top padding + bottom padding + top border + bottom border + top margin + bottom margin
What is the source?
- All the documentation in this page is taken from w3schools